 VOMS Organization/Facility Client User Guide
 |
Provider PreBooking Request
The Provider PreBooking Request page allows providers to submit a prebooking
request. Once the request is submitted, the provider may not make any
further changes to the request. One request may be submitted per organizaztio
or facility. Before the provider can submit a prebooking request, the
provider must be assigned to a prebooking order set by the state on the
Admin & Settings page.
To make a prebooking request, click the Orders
& Returns menu link and then Prebooking
Request . The Provider Prebooking Request page opens. The form
will display only the antigens in the order set that is set to Prebooking
and follows minimum order quantity rules. There are two sections of the
page that can be collapsed and expanded:
- Shipping Info
- Provider Request
The Shipping Information section is divided as follows:
| Section |
Description |
| Shipping Address |
This section displays the current shipping address information
for the organization/facility. If the Admin & Settings
> Properties > Orders Tab > Enable Editing of Contact
Name on the Order Screen option is enabled, users can edit
the information by clicking the Edit icon ( )
located on the right side of the Shipping Address heading,
which opens the Edit Shipping & Contact Information pop-up
window. In this window, only the Primary Vaccine Coordinator's
name, email address, phone number and fax number can be edited.
Make any changes as necessary and click Save.
The updates are displayed on the page. )
located on the right side of the Shipping Address heading,
which opens the Edit Shipping & Contact Information pop-up
window. In this window, only the Primary Vaccine Coordinator's
name, email address, phone number and fax number can be edited.
Make any changes as necessary and click Save.
The updates are displayed on the page.
| NOTE: If
changes are made to the shipping address, the order
is placed in the Approver's Non-Compliant queue for
review. |
|
| Delivery
Hours |
The organization/facility's delivery hours are displayed
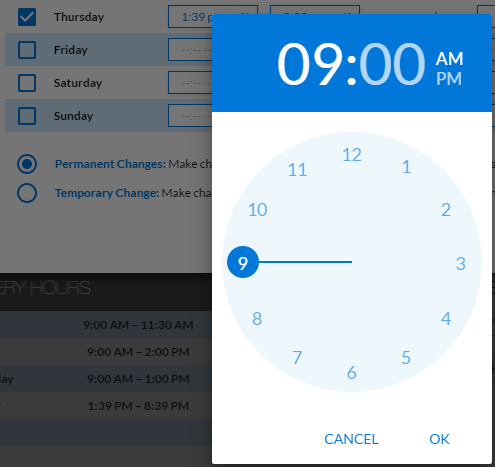
here. To edit them, click the Edit icon on the Delivery Hours
heading, which opens the Edit Delivery Hours pop-up window.
To change a time, click in the hour box and click the hour
number, then click the minutes number (which automatically
appears after the hour number is selected), click AM or PM
if necessary, and then click OK.
Make the time changes as necessary, select Permanent
Change (default) or Temporary
Change, and click Save.
(If Temporary is selected,
user can also enter an expiration date for the temporary change.
If no expiration date is entered, the change is for that order
only. If a backorder is created prior to the expiration date,
the temporary change is also used for the backorder if it
is sent before the expiration date.) To remove a time, click
the X next to it.
| NOTE: If
the Admin
& Settings > Properties > Orders > Show
Additional Shipping Times option is enabled
in VOMS, users can add morning and afternoon times
(with a lunch time period in between). For example,
if the office is closed between 1:00 - 2:00 p.m.,
enter 09:00 AM - 01:00 PM in the first set of hours
and 02:00 PM - 05:00 PM in the second set. If the
option is disabled, only one start and end (open and
close) time can be entered for each day. |
|
| Delivery Instructions |
Enter any special delivery instructions in the textbox
(where it says Enter special
instructions: landmarks, doors, etc.). Limited to 35
characters. |
The Provider Request section is divided as follows:
| Column/Field |
Description |
| Vaccine |
The vaccine name, product, packaging information, and NDC
number for the specific vaccine lot number. |
| Doses Requested |
Enter the requested number of doses
for the order. The doses requested must be equal to or above
the minimum order quantity. Warning messages appear if the
requested number of doses is below the minimum order quantity
or above the maximum order quantity. |
NOTE: If the "Enable Restrict
Funding Source" Property is selected on the Properties-Prebooking
tab and a funding source is restricted for the provider, they may not
request a vaccine associated with the restricted funding source(s). The
Doses Requested text box will remain 0 for the restricted vaccine.
When finished entering information into the form, click one of these
buttons:
- Save
- Saves the information so that the user can return to it later.
- Submit
- The form is submitted and a confirmation messages appears; click
Close to close the message
pop-up window. The user wil be redirected to the Home page.
- Cancel
- Does not save any changes made to the page and returns the user
to the VOMS Dashboard.
When the form is submitted, the order will go to the State Approver
for approval. The form can only be viewed after it has been submitted.
Once the order has been shipped, the status of the order will be displayed
on the Orders & Returns > Inbound Orders tab. The receiving process
will remain the same for prebooking orders. See the Receive an Order/Transfer
page for more information.
Related topics: