|
|
Authorized users can search for, add, and edit inventory. To do so, click the Inventory > Search/Add Inventory menu link. The Search/Add Inventory page opens in VOMS.
Use these links to jump to a specific section below:
The Search/Add Inventory page displays search filters and a search results
section. Click the Filter icon ( )
to collapse or expand the filters section as needed.
)
to collapse or expand the filters section as needed.
Use the search filters to search for specific vaccines or types of vaccines. To narrow the search results, enter more criteria. To produce more search results, remove search criteria from one or more filters. The search results automatically update as the search criteria change. The search filters include:
| Search Field | Description |
Barcode Scanner |
If a barcode scanner has been installed, click where it says Barcode Scanner: Not Ready. Click Here to Activate, then scan the barcode. The information appears in the Search field or an error message displays. If the barcode does not already exist in inventory and the user has the appropriate permissions, a prompt appears asking if the vaccine should be added to inventory. Note that the Administration > Properties > Registry Settings > Enable Barcode Tools option must be enabled in IWeb. See Barcode Scanning below. |
Search field |
Enter the first few characters of a vaccine name, facility name, or lot number and then select from the drop-down list. |
Vaccine |
To limit the search to a specific vaccine, enter the first few characters of a vaccine name and then select the vaccine from the list. |
Facility |
To limit the search results to a specific facility, select it from the drop-down list. |
Lot # |
To limit the search results to a specific lot number, enter it in this field. |
Funding Source |
To limit the search results to a specific funding source, select it from the drop-down list. |
Product Name |
To limit the search results to a specific product name, select it from the drop-down list. |
Status |
To limit the search results to either Active or Inactive lots, select the appropriate option. |
Inactive Reason |
If Inactive status is selected, limit the search results to a specific Inactive Reason by selecting it from the drop-down list. |
Clear |
To clear all of the search filters and start over, click Clear. |
The search results appear underneath the filters. Click a column heading to sort by that column. The columns and buttons displayed in the search results section are as follows:
| Column / Button | Description |
View (button) |
Click this button to view the details of a vaccine lot, as well as to make changes. See Edit Inventory for more information. |
Vaccine |
The vaccine name, product information, and NDC number. |
Lot # |
The vaccine lot number. |
Expiration Date |
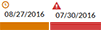
The vaccine expiration date. If the
vaccine lot is due to expire in less than 90 days, a clock
icon is displayed above the date and the cell displays a yellow
bar. If the lot has already expired, a triangle icon with
an exclamation point (!) is displayed above the date and the
cell displays a red bar. Examples: |
Funding Source |
The vaccine funding source. Examples: PUB (Public), PRVT (Private). |
Facility |
The name of the facility where this vaccine lot resides. |
Inactive |
If the lot is inactive, a Yes appears in this column. |
(Page Numbers) |
If there are multiple pages of search results, page numbers appear at the bottom of the list. Click the Next (or Previous) arrow or a specific page number to view additional pages. |
Add New Inventory |
Click this button to add new inventory. See Add New Inventory for more information. |
| NOTE: If the IWeb Administration > Settings > Properties > Vaccine Management > Do Not Allow Facility Client to add new inventory using "Lot number - Search/Add" option is enabled (selected) in IWeb, Facility Client users cannot add new lot numbers on the Lot Number Maintenance page either manually or via barcode scanning. |
To add new inventory, click the Add New Inventory button, located under the list of available inventory (the search results list). The Add New Inventory page opens. Enter the information as needed and click Save. The fields and options in this section are as follows:
| Field/Option | Description |
Vaccine |
Click in the field and select the vaccine from the list. This field is required. |
Facility |
The facility may be pre-populated in this field; otherwise, select the facility from the drop-down list. This field is required. |
Funding Source |
Select the funding source from the drop-down list. This field is required. |
Lot # |
Enter the vaccine lot number. This field is required. |
Exp Date |
Click it the field and select the expiration date from the pop-up calendar. Click OK when finished. This field is required. |
Category |
Select the lot creation category from the drop-down list. This field is required. Examples:
|
Reason |
After selecting the lot creation category, select a Reason from the drop-down list. This field is required. |
Quantity |
Enter the vaccine quantity. |
Inactivate |
To inactivate this lot, slide the toggle switch to the right and select an Inactive Reason. |
Inactive Reason |
If this lot has been inactivated, selected an Inactive Reason. This field is required if a lot is inactivated. |
Once a new lot has been added, the information displays at the top of the Lot Number Maintenance page and three new buttons appear underneath:
Search for and/or locate the specific vaccine in the list and click the View button. The Lot Number Maintenance page opens in VOMS with the vaccine details. Authorized users can edit the information; other uses can only view the information on this page. The following fields, options, and buttons are available on this page:
| Field / Option / Button | Description |
Vaccine |
The name of the vaccine, NDC number, and product information is displayed here (read-only). |
Facility |
The name of the facility where the vaccine lot resides. Read-only until the Edit button is clicked. |
Funding Source |
The funding source for this vaccine lot. Read-only until the Edit button is clicked. |
Lot # |
The lot number for this vaccine. Read-only until the Edit button is clicked. |
Exp Date |
The expiration date for this vaccine lot. Read-only until the Edit button is clicked. |
Total Doses |
The total doses on hand for this vaccine lot. Read-only until the Edit button is clicked. |
Available |
The total number of doses available in inventory. |
Wasted & Returned |
The total number of doses wasted and returned. Zero and read-only until the Edit button is clicked. |
Wasted & Disposed |
The total number of doses wasted and disposed. Read-only until the Edit button is clicked. |
Outbound |
The total number of doses that are currently outbound but have not yet been received. Read-only until the Edit button is clicked. |
Used |
The total number of doses used. Read-only until the Edit button is clicked. |
Corrected (+) |
If corrected, the total number of doses that were increased. |
Corrected (-) |
If corrected, the total number of doses that were decreased. |
Inactivate |
Indicates whether the vaccine is Active or Inactive. Read-only until the Edit button is clicked. |
Inactive Reason |
If the vaccine lot is inactive, this displays the Inactive Reason (if one exists). Read-only until the Edit button is clicked. |
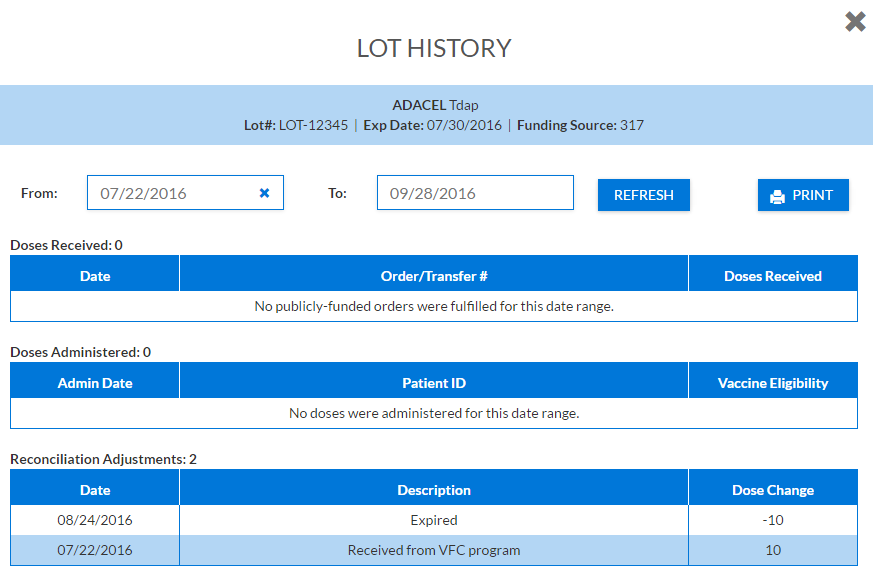
View Lot History |
Click this button to open the Lot History window and view details about the vaccine lot's history within the organization/facility. A date range can be entered and the details can be printed. Click the X in the upper right-hand corner to close the window.
|
Cancel |
Click this button to close the Lot Number Maintenance page without saving any changes. |
Edit |
Click this button to edit the vaccine details. All of the fields become available except for the first one, the Vaccine information. |
After clicking Edit, edit the details as needed and click Save.
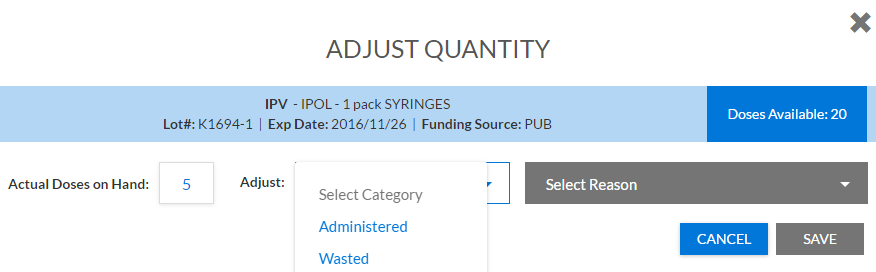
To edit the dosage numbers, click Adjust. Enter the number of actual doses on hand, select an adjustment category (such as Administered or Wasted), select an adjustment reason, and click Save. Example Adjust Quantity window:
To inactivate a vaccine lot, slide the Inactivate toggle to the right. The Inactive Reason drop-down list becomes available; select a reason from the list. Click Save to save the change and return to the Search/Add Inventory page.
Lot numbers cannot be deleted, but they can be inactivated so that they are not available for use. Prior to inactivating lot numbers, users must adjust the inventory quantity to zero.
Some states only allow Registry Client users to inactivate lot numbers. If the Administration > Settings > Properties > Vaccine Management > Allow Only Registry Clients to Inactivate Lots option is enabled in IWeb, the Registry Client must also have the Inactivate Lot Numbers permission.
To inactivate a lot number, first search for it and then select it in the search results to open the Lot Number Maintenance page. Click the Edit button, then toggle the Inactivate switch to the right to turn it on. Select a reason from the Inactive Reason drop-down list. Click Save when finished.
To exit out of this page, select another link in the menu.
| NOTE: A lot number can also be inactivated from the Reconcile Inventory page in VOMS (Inventory > Reconciliation). Once the quantity of a lot is zeroed out, click the Inactivate checkbox for that lot number. See Reconciliation. |
If the Administration > Properties > Registry Settings > Enable Barcode Tools option is enabled in IWeb, Registry Client users can use barcode scanning as an inventory search method. Either 1D or 2D barcodes can be scanned.
The status of an installed barcode scanner is displayed in the upper right-hand corner of the Search/Add Inventory page, on the same line as the Filter icon: either Ready or Not Ready. Example:

The VOMS application supports scanning of:
When the barcode scanner status displays Ready, scan the barcode. The system evaluates for matching inventory and, if found, the vaccine information appears in the Search field. The following items are assessed for deduplication:
If a 1D barcode is scanned and there is existing inventory with a matching product ID/GTIN, all matching inventory is displayed in the search results. If no matching inventory is found, a message displays to inform the user.
If a 2D barcode is scanned and there is existing inventory with a matching product ID/GTIN, lot number, and expiration data (all three criteria), the Lot Number Maintenance page for that vaccine lot opens. If no existing inventory matches all three criteria, the user is prompted whether or not they want to add the inventory and if the user has the appropriate permission(s) and chooses to add the inventory, the Lot Number Add page opens with the information pre-populated. Otherwise, the user is returned to the main Search/Add Inventory page. If the user does not have the appropriate permission(s), a message appears for them to contact their system administrator.
If a 2d barcode is scanned and there is no GTIN found in product settings that matches, a message displays to inform the user that the barcode has not yet been configured in the system.