|
|
To upload a cold storage temperature log, first click the Cold Storage menu link, then click Upload Temperature Log on the Cold Storage page. The Temperature Upload page opens, with a workflow displayed at the top. The workflow is as follows:
After selecting the options and file to upload, click Import. Click Clear to clear the fields and start over.
The available fields and options on the Temperature Upload page are as follows:
| Field/Option | Description |
| Select Cold Storage | Select the cold storage unit from the drop-down list. |
| Select Profile | If the data profile has already been created, select it from the drop-down list. |
| Edit | Click this button to edit the profile. |
| Define Data Profile | Click this button to create a new data profile. See Define a Data Profile. |
| Select File | Click this button and locate the file to be uploaded. See Edit a Data Profile. |
Once the Import button is clicked, a success or error message displays on the page. If an error message displays, you can view the log information. See View Logs.
| NOTE: No information is saved to the database until the temperature file is successfully imported with no errors. |
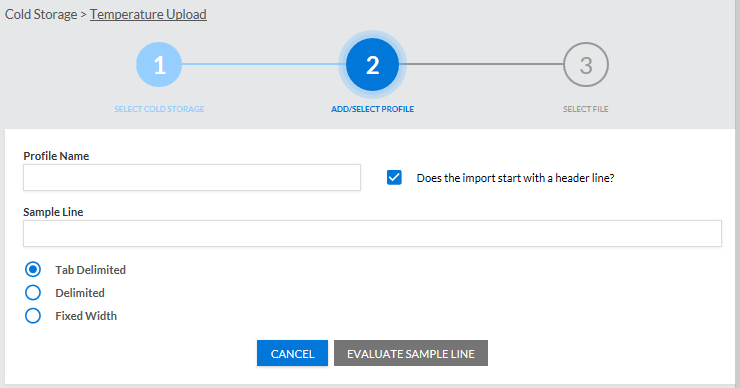
To create a new data profile to use for reading the temperature log, click the Define Data Profile button. A new page opens with additional fields. The available fields and options on this page are as follows:
| Field/Option | Description |
| Profile Name | Enter a descriptive name for the new data profile. |
| Does the import start with a header line? | Select this option if the file to be imported has a header line, so that the application knows that the first line is not temperature data and should be ignored. |
| Sample Line | Copy a sample line from the file and paste it here for testing purposes. |
| (file type) | Select how the fields are separated in the file. Examples:
|
Enter the information and click Evaluate Sample Line. A new section appears on the page where the fields can be assigned. In this Assign Fields section, each field from the sample line appears in the left column. Select the Field Definition and, if necessary, the Data Format for each field type. Click Submit Definitions once the fields have been mapped.
For field definitions, the following options are available:
For data formats, the listed options depend on the selected field definition. For example, if Temperature Record Date is selected as a field definition, the Data Format drop-down lists different date formats. Select the format that matches the field in the Sample Field column.
To edit a data profile, first select it in the Select Profile list and then click Edit. The data profile details appear on the page. Edit them as necessary and click Submit Definitions.
Of note, while the original sample fields are not retained, the field definitions and data formats are retained for easier editing.
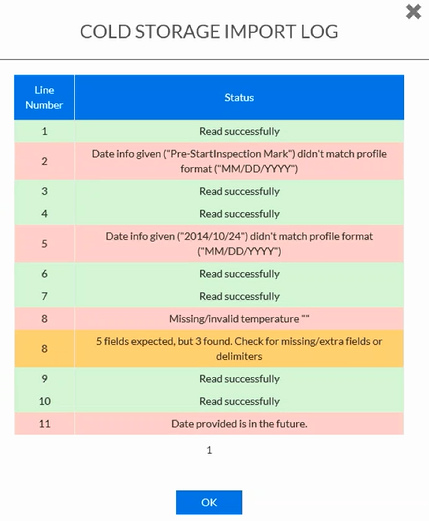
If the temperature log was not successfully imported, you can view the logs to see why not. Click View Logs. The information about the import process appears on the page, including the number of records successfully read and the number of errors. Click the View button for the log to view the error details. The Cold Storage Import Log window opens and displays the success and failure of each line of data. If there is an error, the reason for the error is displayed. Click OK to close the window.
Example Cold Storage Import Log window:
A user with the correct access level and permissions can send temperature data for cold storage units to the state. However, a valid email address must be entered in IWeb for Administration > Settings > Email Settings > Address for Emailing Temperature Logs. To report temperatures to the state, click Report to State on the Temperature Upload page in VOMS. A Save to State pop-up window opens, prompting the user to select either the Min/Max format (minimum and maximum temperatures from each day) or the Twice Daily format. Once the button is clicked (after a short delay), a message appears stating that the log was successfully sent to the state. Click Return to Cold Storage Page to close the window and return to the page.
Of note, a state setting can be configured in VOMS to set the time of day that the temperature reading should be taken. Temperature discrepancies are still noted (above and below the set standard temperature range). See Properties.