|
|
This page is only visible to State users.
The Provider List page allows state users to easily locate and view information about providers at three main stages of the onboarding process: Pre-Discovery, Onboarding, and Production. The lists of providers (organizations and facilities) can be filtered by organization groups, edited, or moved quickly and easily to another stage. Providers can also be added to the process on this page.
To open the Provider List page, click the Provider > Provider List link in the menu. There are three tab sections on this page:
Click
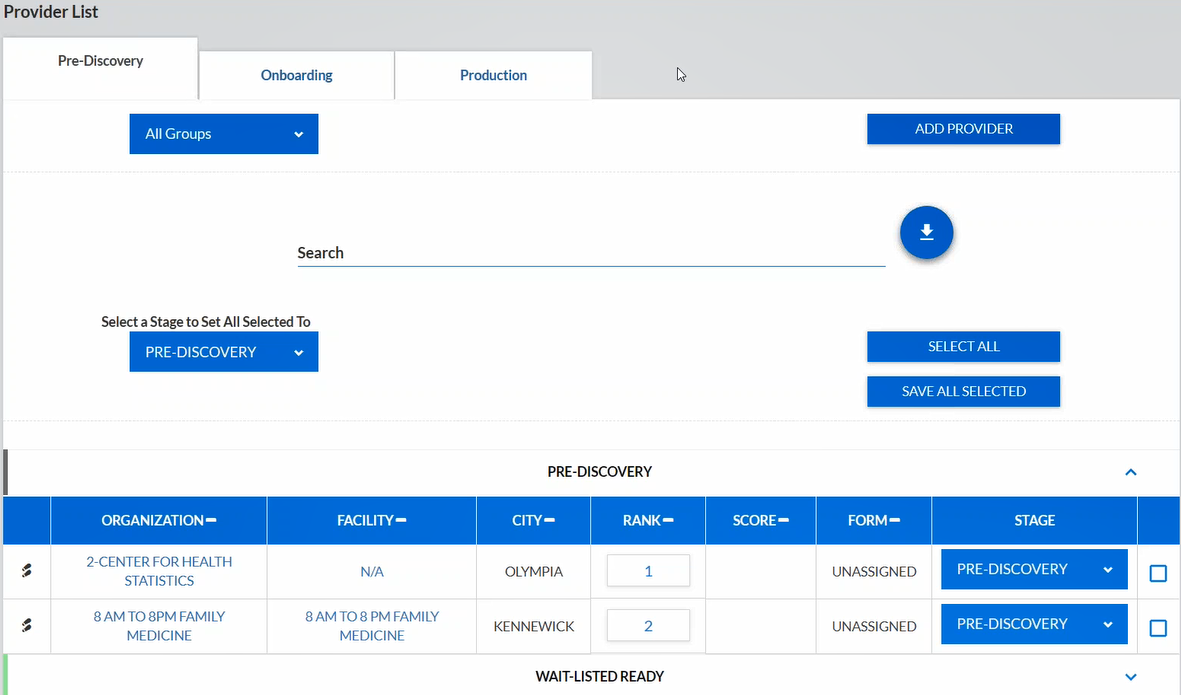
here to see an example Provider List page.![]()
Each sub-stage in a tab section can be expanded or closed by clicking on the sub-stage name. (For example, click the Waitlisted Ready header to expand that section and view the list of organizations and facilities listed there.)
Each of the tabs and stage sections has the same columns. The available filters, buttons, columns, and icons on this page are as follows:
| Filter/Column/Icon | Description | |
All Groups (drop-down list) |
To filter the providers listed on the page (in the Pre-Discovery, Onboarding, and Production section lists) by organization group, select the organization group from the All Groups drop-down list. Only the providers assigned to that group are displayed on the page. To return to a list of all providers, select All Groups from that drop-drown list. The groups are created on the Onboarding Administration page and assigned on the Provider Profile page. |
|
Add Provider (button) |
Click this button to add another provider to the Provider List. See Add a Provider for more information. |
|
Search (field) |
To search for a specific provider on the page, enter a few characters of the provider's name, city, etc., in the Search field. If necessary, expand a section (Pre-Discovery, Waitlisted Ready, etc.) to view the search results. To display all of the providers again, remove the text from the Search field. |
|
Export
(icon) |
Click this icon to export a CSV-formatted file listing of all of the providers that have submitted their interface forms, along with each of the questions and answers on the form. |
|
Stage (drop-down list) |
Use the checkboxes and this drop-down list to change the stage for multiple providers as once - after selecting the providers, select the stage from the drop-down list. Note that the Select All button (see below) selects all providers currently in this selected stage and once the stage is changed, the selected providers are moved to the bottom of the list in the newly selected stage. |
|
Select All (button) |
Click this button to select all of the providers to perform a bulk action with, such as to change their production stage. When the button is clicked, all of the providers within the selected stage (see above) are selected. |
|
Save All Selected (button) |
After selecting multiple providers and perform a bulk action (such as changing their production stage), you can choose to save this action for all of the selected providers. For example, if you perform a bulk action on multiple providers, then decide you don't want to change the stage for one or more of those providers, simply deselect those providers (uncheck their checkboxes) and click Save All Selected. Only the selected providers are saved. |
|
Onboarding icon |
Click the Onboarding
icon ( |
|
Organization |
The name of the organization. Click on the name of an organization or facility to open the Provider Profile page for that provider. See Provider Profile for more information about that page.
|
|
Facility |
The name of the facility, if applicable. Click on the name of an organization or facility to open the Provider Profile panel for that provider. The panel for that provider slides in from the right side, providing access to the provider's contact information and uploaded documents. See Provider Profile for more information about this panel and about uploading documents. To close the panel and return to the Provider List page, click in a white area of the menu (i.e., any empty area on the page to the left of the open panel). |
|
City |
The provider's city. |
|
Rank |
The provider's current waitlist rank. This signifies their ranking in ability to be onboarded. (This waitlist rank is also displayed on the Healthcare Provider Onboarding Panel. See Onboarding.) To change a provider's waitlist rank, enter a different number, then click away from the number to save it. When a new provider is added to a stage, it is added to the bottom of the list (with the highest ranking number). When you change a waitlist rank, the provider that already has the assigned number - and all of the providers after it in rank - is moved down one number. For example, if there are six providers and the provider with the rank of 6 is given the new rank of 3, the provider that was previously ranked 3 is moved to 4, #4 is moved to the fifth position, and #5 is moved to the sixth position. If a provider is given a new rank that is much higher than the number of providers in that stage in the list, it is moved to the end of the list and given the last number. For example, if there are six providers and provider #3 is given the new rank of 99, it is moved to the end of the list and given a rank of 6.
|
|
Score |
The provider's current score, based on the weighted score applied to specific answers on the assigned Interface Form (Admin > Interface Form). |
|
Form |
The status of the interface form for this provider. Examples: Draft, Submitted, None Assigned. |
|
Stage |
The provider's current stage. To change the stage, select the new stage from the drop-down list. The provider is then automatically moved to that stage on the appropriate tab. For example, if Provider A's stage was changed from Pre-Discovery to Discovery, the provider's row in the list would move from the Pre-Discovery section of the Pre-Discovery tab to the Discovery section of the Onboarding tab. |
|
(checkbox) |
Click the checkbox to select the provider for an action, such as to change the stage. |
Existing providers in the IIS can be added to the Pre-Discovery tab section on the Provider List page. To add an existing provider, click Add Provider. The Add Provider pop-up window opens with a list of available organizations/facilities in the IIS that can be added to the Provider List page and onboarding workflow. To more easily locate a provider in the list (or if the window opens with no providers listed), enter the first few characters of the provider's name, address, city, or VFC PIN in the Search field. The list automatically narrows to match the entered criteria. To expand the list again, remove the characters from the Search field.
After locating the provider in the list, select it. Multiple providers can be selected. When finished selecting providers to add, click Add on the bottom right of the window. The provider is added to the bottom of the list of Pre-Discovery providers.
To close the Add Provider window without selecting a provider, click Cancel.

 ) on the far
right side of the provider's row (next to the provider's current
stage). The Healthcare Provider Onboarding Panel opens from
the right side of the page (and the organization/facility
name appears in the search bar). (This panel can also be opened
by clicking the Onboarding icon at the top of the page.) For
more information about the panel, see
) on the far
right side of the provider's row (next to the provider's current
stage). The Healthcare Provider Onboarding Panel opens from
the right side of the page (and the organization/facility
name appears in the search bar). (This panel can also be opened
by clicking the Onboarding icon at the top of the page.) For
more information about the panel, see