|
|
If the organization/facility has the Allow online orders option enabled in IWeb, authorized users can create new orders from the Orders and Transfers page. Depending on an organization/facility's configuration settings, however, users may be required to update cold chain reporting, correct decrementing, and/or reconcile inventory before creating a new order. To skip the cold chain documentation and inventory reconciliation steps, click the Skip button located at the bottom of the page.
To create a new order, navigate to Orders & Returns > Orders & Transfers and click the New Order button on the Orders and Transfers page. The Create New Order page opens and the required workflow steps are displayed at the top of the page. The current step pulsates in blue to help identify the user's progress in creating and submitting a new order. For example, if the user is required to reconcile inventory, Reconcile Inventory may be the first step in the workflow.
If the Administration > Properties > Vaccine Management > Display Accountability Report Links on Order option is enabled (selected) in IWeb, an Inventory Report Links section appears near the top of the Create Order page in VOMS. Click a listed report name to open that report's parameters page in IWeb, to generate the report.
| NOTE: If the Allow Only One Brand Selection per Vaccine option is selected for the facility in IWeb, providers are restricted from selecting multiple brands for the same vaccine in an order set. This allows for improved documentation accuracy. |
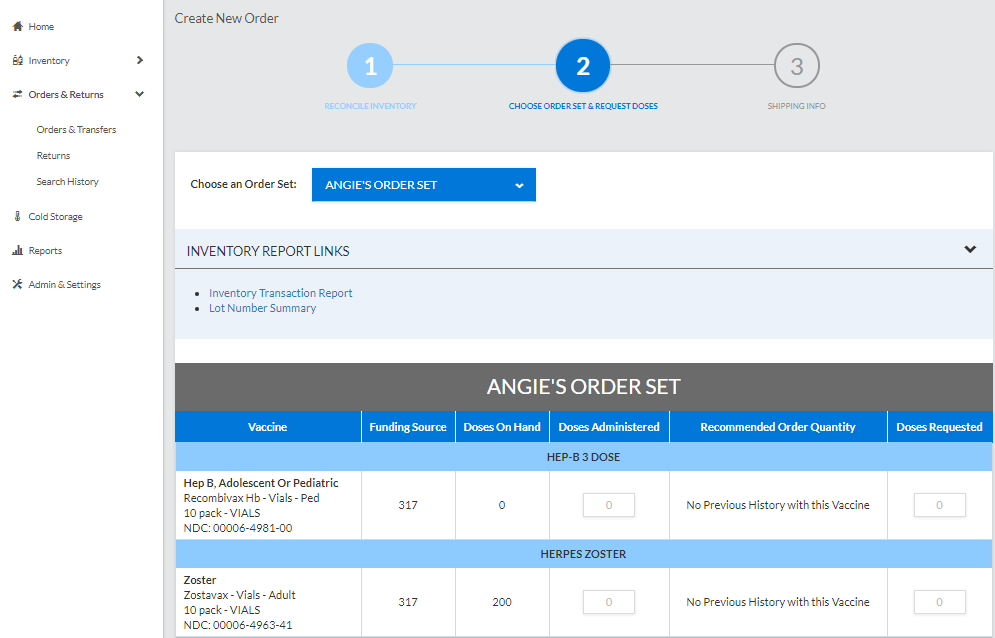
The first main step in the actual ordering process is to select which order set to use. Select the order set from the drop-down list (if there is only one order set, there may not be a drop-down list). The page refreshes to show the vaccine lots available in that order set, along with inventory report links (click on a link to set the report parameters and run that report). On the Create New Order page, edit the order fields as necessary, select any options, enter any comments, and click Next to continue to the next step.
Click
here to see an example Create New Order page for Step 2: Choose Order
Set & Request Doses.![]()
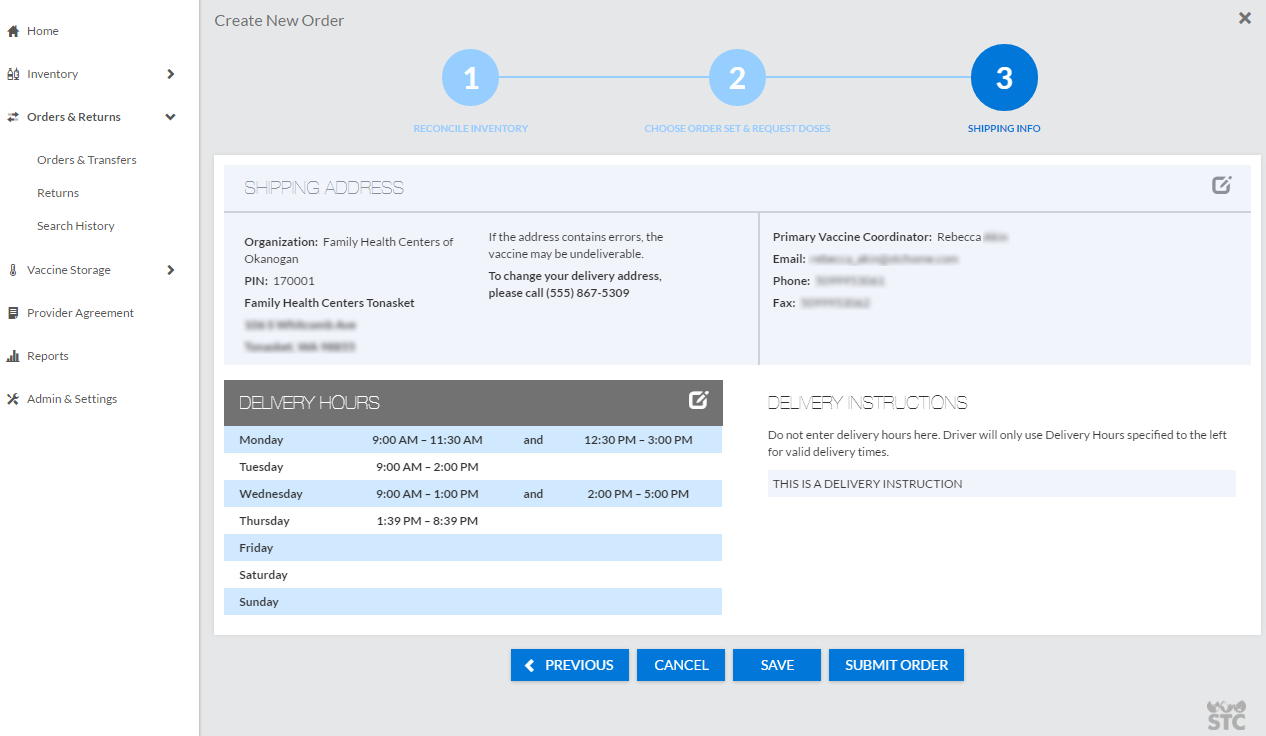
Click
here to see an example Create New Order page for Step 3: Shipping Info.![]()
The columns and fields available on this page after selecting an order set are as follows:
| Column/Field | Description | |
| Inventory Report Links | If the Inventory Report Links section is hidden (i.e.., the arrow is pointed to the right: >), click the header line to expand it (after which the arrow changes to point downward). To collapse the section to shorten the page length, click the header line again. This section lists related reports. For example: Click on the report name to go to the parameters page for that report. Enter any report criteria and click Create Report to generate the report. See Reports for more information. |
|
| (Vaccine Family) | Each vaccine family is identified with the family name in a row with a light blue background color, after which each vaccine lot is listed separately (with a white background color). Example vaccine family names: DTaP/DT/Td, FLU, HEP-A, HEP-B 3 DOSE. | |
| Vaccine | The vaccine name, product, packaging information, and NDC number for the specific vaccine lot number. | |
| Funding Source | The vaccine funding source. Examples: PUB (Public), PRVT (Private), STATE, VFC, 317. | |
| Doses on Hand | The current number of doses on hand. | |
| Doses Administered | The number of doses administered. This field can be edited. | |
| Recommended Order Quantity (configurable option) | This is the recommended order quantity (ROQ). If the vaccine has not been ordered before, the message No Previous Order History appears in the field. Otherwise, the recommended order quantity appears as a button that can be clicked for information on how the amount was calculated. After clicking the number, the Recommended Order Quantity window pops up with a history of the previous doses administered and the calculation for the ROQ. | |
| Doses Requested | Enter the requested number of doses for the order. The doses requested must be equal to or above the minimum order quantity. Warning messages appear if the requested number of doses is below the minimum order quantity or above the maximum order quantity. If there is a discrepancy, a link icon appears
in the field (
|
|
| Order is Urgent | If the order is urgent, toggle the slider to On (the slider turns blue and the Priority Reason drop-down list becomes available) and then select a Priority Reason. |
|
| Priority Reason | If the order is urgent, select the option (see above) and then select a Priority Reason from the drop-down list. If Other is selected, enter a detailed reason in the Comments textbox. If the order is urgent, a priority reason is required. | |
| Comments | Enter any comments related to the order. If Other was selected as an urgent order Priority Reason, enter the detailed reason here. |
Sort the list by clicking on a column header.
Click Save to save the current order information so far. Click Next when ready to continue creating the order. The page for the shipping information opens. This page is divided as follows:
When finished updating the shipping information, click one of these buttons:
 ).
Click it to open the Reason for Discrepancy pop-up window,
select a reason for the discrepancy and enter any comments,
then click
).
Click it to open the Reason for Discrepancy pop-up window,
select a reason for the discrepancy and enter any comments,
then click  ). Click
it to review the discrepancy reason and any comments.
). Click
it to review the discrepancy reason and any comments. ) located on the right side of
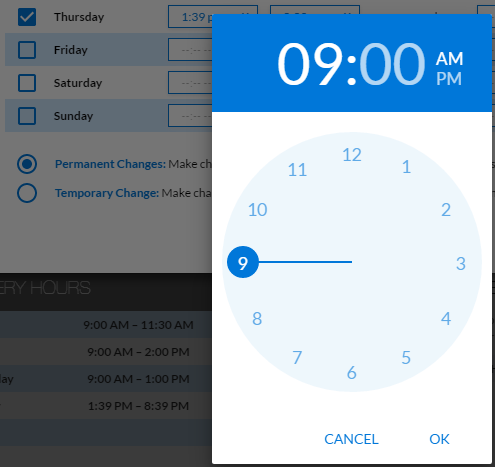
the Shipping Address heading, which opens the Edit Shipping
& Contact Information pop-up window. In this window, only
the Primary Vaccine Coordinator's name, email address, phone
number and fax number can be edited. Make any changes as necessary
and click
) located on the right side of
the Shipping Address heading, which opens the Edit Shipping
& Contact Information pop-up window. In this window, only
the Primary Vaccine Coordinator's name, email address, phone
number and fax number can be edited. Make any changes as necessary
and click