 SMaRT AFIX AFIX User/AFIX Coordinator User Guide (v. July 2018) SMaRT AFIX AFIX User/AFIX Coordinator User Guide (v. July 2018) |
AFIX Export
AFIX Coordinators can report AFIX assessment results to the CDC AFIX online tool by using the links in the AFIX Export category on the menu. The available menu links in this category are:
- Childhood - Allows users to generate an export file for the childhood assessment data. See Childhood AFIX Export
- Adolescent - Allows users to generate an export files for the adolescent assessment data. See Adolescent AFIX Export
- Childhood & Adolescent - Allows users to generate an export file for both the childhood and the adolescent assessment data, together.
Note that when the CDC AFIX Online Tool is unavailable, users should review the information on the page (and double-check the facility name at the top of the list), then print/save a PDF version of the summary for reference when reporting the results to the CDC's AFIX Online Tool.
Import to the CDC's AFIX Online Tool
SMaRT AFIX allows you to export an XML file of childhood and adolescent data to import into the CDC's AFIX online tool.
To export the data, click the I acknowledge that this page is complete, and all responses are final checkbox at the bottom of the related AFIX Export page (Childhood AFIX Export, Adolescent AFIX Export, or Childhood and Adolescent AFIX Export). Next, click the Export icon ( ). The XML file automatically downloads to the computer. Note the location of the file for use when it is time to import the file using the CDC AFIX online tool.
Of note, the CDC's AFIX online tool can currently only import childhood and adolescent coverage and missed opportunity data separately per cohort. However, if an XML file contains data for both the childhood and adolescent cohort, the same file can be imported for both pages; only the data for the currently selected cohort is imported.
 The instructions below detail how to upload the file(s) exported from SMaRT AFIX to the CDC's AFIX online tool. These are not detailed instructions on how to use the CDC's application; see the CDC's website for that information. The instructions below detail how to upload the file(s) exported from SMaRT AFIX to the CDC's AFIX online tool. These are not detailed instructions on how to use the CDC's application; see the CDC's website for that information. |
To import this file using the CDC's AFIX online tool, follow these steps:
- Use your browser to open the CDC's AFIX online tool's login page.
- Using the login credentials given to you, log in to the AFIX Site Visit Tool.
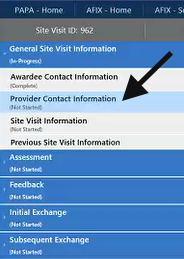
- Click the General Site Visit Information header in the left side navigation, then the Provider Contact Information link. Enter your provider information on the page.
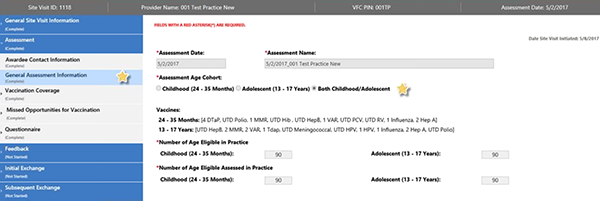
- Click the Assessment header in the navigation menu, and then the General Assessment Information link. Select either Childhood, Adolescent, or Both, enter additional information on the page as needed, and click Save and Continue at the bottom.
- Currently, coverage and missed opportunity data for childhood and adolescent cohorts must be imported separately. However, the same file can be used; only the data for the selected cohort is imported.
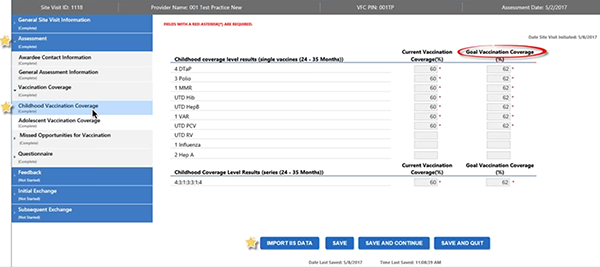
Click the Vaccination Coverage (or Missed Opportunities for Vaccination) header in the navigation menu and then the Childhood or Adolescent link as needed. At the bottom of the page, click the Import IIS Data button.
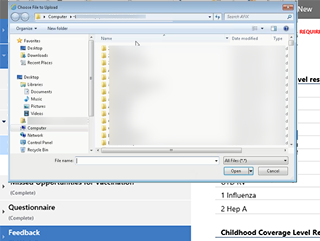
- The tool prompts you to locate the XML file exported by the application. Select the export file and click Open.
- If the import was successful, a verification message appears on the page and the assessment results display in the first column. Manually enter the goal data in the second column fields, confirm the accuracy and completeness of the entire data on the page, and click Save and Continue.
- Enter the data on the remaining pages (and re-upload the file(s) as needed) per CDC and state policies and procedures.
- Save the data and log out.
Related topics: